HTML Canvas Snow With Javascript
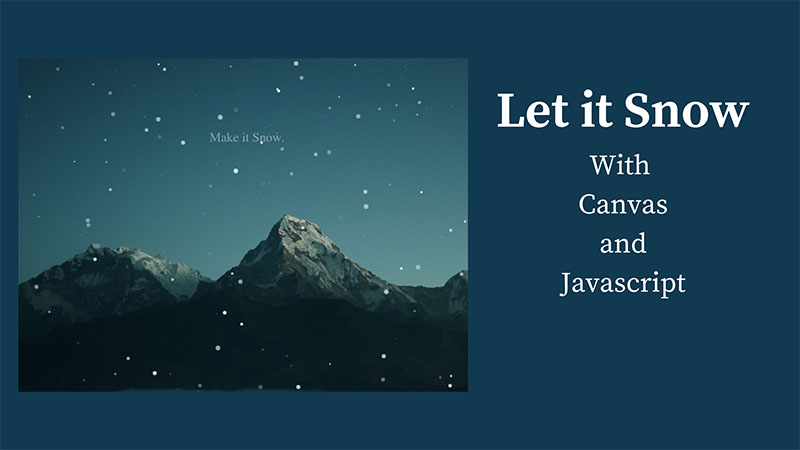
Well since winter is coming very soon and i was bored i decided to make something fun with the canvas element and javascript. I wanted to make a falling snow effect and this is what i came up with.
Let’s begin with the file structure
- index.html
- index.js
- style.css
- images
- image.jpg
Diving in to index.html it’s pretty straightforward
1 |
|
Here’s a quick tip: if you are using VScode, type exclamation mark in an empty .html file and hit enter, it will generate a starting template for you.
Straightforward HTML nothing much to talk about here, some classes are added some divs sections and a p tag, and of course, a link to our css and a link to our javascript file which is placed at the end of the body tag.
Moving on to the style.css file same story straightforward css
1 | html{ |
Added a background image, set some properties for the canvas, centered our text and made it a bit better to look at ;)
Now here comes the fun part jumping to index.js
1 | var canvas = document.getElementById("canvas"); |
First we grab a reference to our canvas element and the canvas context
1 | var particlesOnScreen = 245; |
Here i add some variables like the particlesOnScreen which we will use to set how many particles (or flakes) are on screen at a given time, than we have the particlesArray which we will populate later and an h and a w variable that will hold the client’s width and height of the screen. At the same time im setting values for h and w and for the canvas width and height;
1 | function random(min, max) { |
Here i defined a random method that takes two parameter and will help us generate a random number later.
1 | function clientResize(ev){ |
clientResize method will be used to reset the values of the canvas if the screen size changes and also it will reset the size of our flakes.
1 | function createSnowFlakes() { |
Alright here the createSnowFlakes method will populate the particlesArray with an object containing the X and the Y axies of the snowflake multiplied the width and the height of the screen so they will start to move immediately when we call the moveSnowFlakes function which we will create later. The opacity random generated - we will use this for the opacity of the snowflakes to have some variety and then the speedX and speedY also randomly generated so we can move the snowflake around the screen in different speeds and last we have the radius of our snowflake since in this case the snowflake is just a circle.
1 | function drawSnowFlakes(){ |
Now the drawSnowFlakes will help us draw the actual circle on the screen. In a for loop we are creating a radial gradient using ctx.createRadialGradient() and this takes a few parameters like: the x-axis coordinate of the start circle, the y-axis coordinate of the start circle, the radius of the start circle, the x-axis coordinate of the end circle, the y-axis coordinate of the end circle and the radius of the end circle.
Next we use addColorStop() that takes 2 values first value is a value between 0.0 and 1.0 that represents the position between start and end in a gradient and a A CSS color value to display at the stop position.
1 | gradient.addColorStop(0, "rgba(255, 255, 255," + particlesArray[i].opacity + ")"); |
In our case at this example the position is 0 and we add an RGBA color with the randomly generated opacity we had from before. Next we create a new path with ctx.beginPath(); and add a circular arc ctx.arc(); that takes 6 parameters (explained in the comment of the code snippet). This is the actual drawing/creation of the circle/snowflake and then we set the color to fill out our drawing pattern with ctx.fillStyle = gradient and call ctx.fill(); to fill the object in our case the snowflake.
1 | function moveSnowFlakes(){ |
It’s finally time to move the snowflakes around our screen again in a for loop we increment the X and Y axis with the X and Y speed and when the snowflakes reaches a value grather than the height of the screen we reset it to start again from the top with a random X axis value and -50 Y axis value. Also the snowflakes are moving all around the screen because we added a negative and positive value in our speedX: random(-11, 11) property. And this makes it sort of like they are floating all around the screen.
1 | function updateSnowFall () { |
updateSnowFall(); is called on an interval of 50ms and it contains ctx.clearRect(0, 0, w, h); that clears the canvas so that we don’t get the snowflakes painted one behind the other. And of course we are calling in the drawSnowFlakes(); moveSnowFlakes(); and createSnowFlakes(); methods.
i’ll paste the full .js file below also i’ll have a video available and probably i’ll put this on github.
1 | var canvas = document.getElementById("canvas"); |
Thanks for your time, if you have any questions or ideas feel free to post them and as always, ill cya in the next one.
Photo by Daniel Leone on Unsplash